Exhaust System
Page

Index:
Borla Cat-Back Exhaust System
TRD Cat-Back Exhaust System
Other Cat-Back Exhaust Systems
Edelbrock Exhaust Headers
TRD Exhaust Headers
Borla Cat-Back
Exhaust System:

The
quickest and easiest thing that I did was install a Borla Cat-back Exhaust system. I purchased
the system from Performance Products. The system came with a
how-to video that explained how to remove the old
system and install the new system. The removal of the
old system is straight forward and took about ten
minutes. The new system would have gone on in about
the same time, but I hit a snag. I was unable to
install the oxygen sensor in the port provided due to
a sloppy weld. I had to take the connector pipe back
off and enlarge the hole with a file.
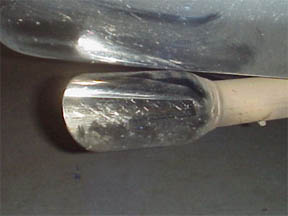
It is real dirty. I took this pic
just before I took it off.
Once
everything was installed, I started it up. Wow, it
sure did sound nice! Was there any increase in
performance? Probably, but nothing real noticeable.
This is one of those "personal
satisfaction" modifications. If it does not
sound right, nothing else matters.

I
am planning on removing my TRD Cat-Back and
reinstalling my Borla Cat-Back system. I also am
planning on changing the tip to a dual Borla Carbon
Fiber Tip. I have seen some of these tips installed
on project cars in magazines and they look very nice.
The problem is these Borla has these tips made for
them and the supply is very limited. I am told it
will take 10 weeks to get it in.
Back to
index
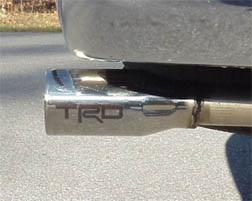
TRD Cat-Back
Exhaust System:
Borla makes this exhaust system
for TRD. I had heard that TRD was going to stop using
Borla as a supplier and switch to another company. I
was at Conicelli
Toyota picking up my TRD headers and found out that
they had the Borla made TRD system in stock so I
grabbed it.
I have heard that TRD is having
Tri-Flow make there new systems for them. I have not
seen one and can not comment about it.
The TRD system looks like that
factory system except for it uses a Borla muffler and
has a nice tip that goes straight out the back
instead the side. It also uses the same type of OEM
flange connections.
It is a real nice system and
installs easily. It sounds just like the Borla
Cat-back.

I am having a few problems with
it. The flange that connects the muffler section to
the tail pipe section rubs and vibrates against my
rear Addco sway bar. The tip also bangs on the
underside of the bumper when I hit large bumps. These
problems are driving me nuts. I was planning to make
some modifications to correct the problems, but then
I had a thought, why. I have a perfectly good Borla
cat-back that is completely free of problems. I am
going to remove the TRD Cat-back and reinstall my
Borla cat-back soon.
Please no emails asking for my
TRD cat-back, it is promised to my brother.
Back to
index
Other Cat-Back
Exhaust Systems:
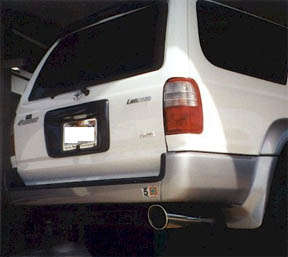
Here is a picture
of the GReedy Cat-Back system. Go to M-n-M's
web page for more information and pictures.

Here is a picture
of Charlie's home made exhaust system. Charlie has
seen what the huge exhaust tips have done for those
little tiny Hondas and figures this mod is good for
at least 100 HP, but he thinks he might have lost
about 3/4 lb-ft of torque. All he needs now is some
high temp paint.
Back to
index
Edelbrock
Exhaust Headers:
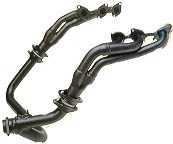
Looking for
still more performance, I decided to install the
exhaust headers from Edelbrock. When I unpacked the
box the headers came in, I thought to myself that
this should be easy. I set aside an afternoon and got
started (it took two days).
The first thing
I tried to do was to remove the crossover pipe. The
crossover pipe connects the left exhaust manifold
with the right one. I started to remove the three
nuts on the back of the right manifold where the
crossover pipe attaches. I got each nut about half
way off and each of them seized. I could not get them
off with a six-point socket. The nuts started to
round off. I tried tightening them back up, and no
luck. They simply would not budge. I used a torch and
tried to heat the nuts hoping that they would
release. They still would not budge. Well now I was
committed. I could not tighten everything back up and
forget it, it had to come off now.
Out came a
bigger torch. I flame cut all of the nuts and studs
that held the crossover pipe to both manifolds. I
then removed all of the nuts that held the manifolds
to the heads. There was not enough clearance to
remove anything. Everything was binding up. It is
real obvious that everything is pre-assembled prior
to installing the engine in the vehicle. The
installation instructions that came with the headers
said that the crossover pipe could be removed by
guiding it toward the passenger side and then down
toward the frame. Well, I had no such luck.
Everything was one big bind. It was clear that I had
to cut the ends off of the crossover pipe. I did not
flame cut the ends off because I did not want to
cause any heat damage to anything else. We decided to
use an arc welder as a cutting torch. It worked
great. The ends of the crossover pipe were off and I
did not set anything on fire. I have recently learned
that the preferred method is to use an air powered
chisel to chop off the ends.
Once the ends
of the crossover pipe were off the pipe came right
out like Edlebrock said it would. The manifolds
slipped off. I then removed the down pipe, which on
the 4Runner contains the catalytic converter. The old
system was off.
The new system
slips right into place without any fuss. The only
snag was the bottom nut on the center tube of the
left header has to be started before the header is
seated. This is because the end of the stud comes
real close to the center pipe, and with the header
seated there is not enough clearance to start the
nut. Of course I did not figure this out until I had
everything else tightened down. It is also almost
impossible to get a wrench onto this same nut to
tighten it down. It turned out to be a two-man job. I
reached up from underneath blindly with a wrench
while my helper reached around the center pipe with
two fingers and guided the wrench onto the nut. I was
able to get at most a 1/8th of a turn at a
time. Then the process starts over. It took at least
an hour to get this one nut tightened down. All of
the rest of them went with good access with box end
wrenches.
The next step
was to attach the "Y" pipe. It is similar
to the stock crossover pipe, but goes underneath the
transmission and is a snap to install. It has a down
pipe that comes from each header and turns into a
"Y". There is a flange at the end of the
"Y" that connects to the catalytic
converter. There is a port built into the
"Y" for the front oxygen sensor.
The next step
is to attach the catalytic converter. On the Tacoma
and the T-100 it is a no brainer. On those vehicles
the converter bolts into the system at both ends.
This is not the case on the 4Runner. On the 4Runner
the converter is in basically the same place, but it
dose not have a joint on the front. The converter and
the down pipe is one part. You have to take careful
measurements and cut the front of the converter off.
Then weld on a flange that is included in the kit.
Once this flange is welded onto the front of the
converter, it will bolt into the system.
The
instructions then say to start it up and let it idle
without driving it. Allow it to come up to operating
temperature, and then shut it down. After cooling
down completely everything is tightened up again.
Then comes the test drive.
It is
immediately apparent that there is an improvement in
performance. It was really more that I expected. I
think it is most enjoyable at highway speeds. Just
the slightest touch of the throttle yields instant
response and acceleration. There is more power and
torque noticeable at all speeds. Unfortunately, that
pretty black finish goes right up in smoke!
Aside from the
supercharger, the Edelbrock headers were the single
most noticeable increase in overall performance. It
is also the most cost effective performance item I
installed. However, when I factor in the difficulty
of installation, I wonder if it was worth it. If I
had to do it over again I would. I do want to make it
very clear that the installation is a serious job. I
am pretty good with turning wrenches and my good
friend Tim is a professional mechanic. We had all of
the tools, MIG welder, lifts, and access to
Tim’s shop for two days. I believe that if we
did this installation again we could complete it in
one afternoon, because all of the questions have been
answered. I do recommend that you do some serious
thinking before you take this project on. If you do,
and get it completed you will be very happy. I do
have a tip, pay someone to do it for you!
Back to
index
TRD Exhaust
Headers:

TRD originally was going to
have Edelbrock make their headers system for them. I
even have one of the original TRD catalogues with a
picture of the Edelbrock headers in it. No one will
say what happened to the deal between TRD and
Edelbrock.
TRD had Thorley headers design
the header system for them. I will tell you they are
really something. They are a bright stainless steel
with cast stainless steel flanges. They are really
the nicest looking headers I have ever seen and I
just had to have them.
I do not know if it is true or
not, but I have been told that Thorley designed the
headers and TRD has contracted with several different
manufacturers to make the headers for them.
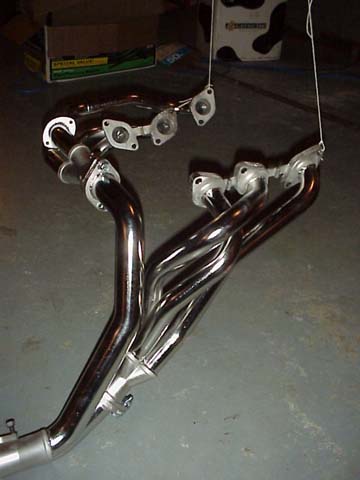
I got mine from Conicelli Toyota. I brought them home and pulled
them out of the box and stuck them together in my
basement for some pictures. I am sorry they did not
come out very good. I then boxed them back up and
shipped them to Performance Coatings to have them
ceramic coated in black satin. They look really nice.
I went to remove the Edlebrock
headers and was having trouble getting to that one
nut that gave me fits during the installation. I got
fed up and used a Saws-All and cut the primary tubes
off of the driver’s side header. After that it
was a snap to remove.
There are a few tricks to the
installation of the TRD headers and overall I think
the installation instructions really suck. The
headers include soft copper gaskets and the
instructions say to also use Permatex high temp
copper silicone sealant on all of the gaskets. Ron
had his TRD headers professionally installed and he
told me that he had heard from several people that
their headers leaked. He said the key to a leak free
installation is to use LOTS of silicone. So I did. I
got that stuff all over everything.
The biggest tip is to pay
someone else to install them for you, but if you
insist on doing it yourself here are the few tips I
have that should make your life easier:
- You will have to bend the
brake line toward the fender to be able to
slip in the passenger side header.
- Rotate the driver’s
side header 90 degrees clock wise and start
to guide the header collector down the side
of the engine and along the side of the bell
housing. Reach your left hand down between
the engine and the firewall from the top and
grab the collector. Pull it around and behind
the cylinder head while rotating the header
clockwise and into position. It will fit but
you will have to be patient.
- Do not tighten down any of
the flange bolts until the whole system is
together.
- The driver’s side
header is in two pieces. After the main piece
is installed you will have to install the
separate tube that goes from the front
exhaust port to the "drop out"
flange behind the engine. It is a little
tough to get it onto the exhaust port studs
and the dropout flange studs at the same
time, but again it will work. Now this is the
biggest tip of all. The drop out flange nuts
are a real PITA to install and tighten down.
The best tool to use is a 13 mm flex socket
in ¼ inch drive with a long extension. I
used a piece of electrical tape and jammed
the nuts into the socket and then approached
the studs from the brake vacuum booster. They
go right on and with that combination of
tools they tighten right up.
- The down tube installs
without any problem. The large nuts and bolts
included with the headers are made so that
you do not have to use a wrench on the other
side while tightening everything down. Real
nice hardware!
- I found that the flange
that bolts to the front of the cat is a
little lower and to the more to the side of
the vehicle then the stock down pipe. To
clear the frame with the cat I had to weld
the flange a little off center. I did not
like the way this turned out and I am going
to redo it as soon as I get another flange
from TRD. I have been told it is on the way.
- If you get the copper
silicone all over the place do not try to
wipe it up. Let it cure and rub it off the
next day.
I found that other then the
dropout flange all the nuts and bolts are real easy
to get to and tighten up, not like the Edelbrock
headers. I think you will find that all the bad
things I said about removing the stock system will
still apply here. The nice thing is I had already
removed the stock system for the Edlebrock
installation.
In comparing the two header
systems I would have to say that the TRD headers
perform better and is a higher quality system, but
costs about twice as much. I would say if money is an
issue just stay with the stock system, if not go TRD.
I had planned on doing before
and after dyno tests to compare the Edlebrock to the
TRD headers. While installing the TRD headers I also
upgraded the fuel injectors and adjusted the valves.
I could not do a fair comparison on the dyno with so
many changes. I will say that seat of the pants in
cruise the TRD headers perform better and would
install them again.
Back to
index
|